Wednesday, October 31, 2012

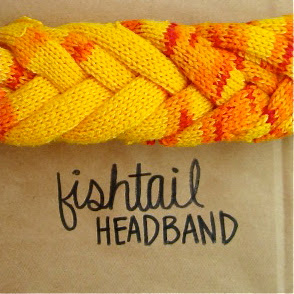
fishtail sweaterband.

I have a problem. It's called Savers. A Goodwill, Salvation Army, consignment store.

Why do I love it?
1. Student discount days.
2. Family Dollar is next to it.
3. The "vintage" section that sometimes contains things from Target's summer 2011 collection.
4. Terrible framed paintings.
5. Sweater.

A typical Danie-Savers shopping experience involves me jetting straight to the sweaters, picking up at least five of them and carrying them around the store When I visit home my sister makes fun of me for my outrageous (AND REALLY WARM. AND SOFT.) sweaters. When you have to spend your winters in Minnesota, you need sweaters. I love my Savers sweaters. They keep me warm and usually require no jewelry. They're that special.

But I have this one sweater...it's uh...it's from a company called Girl Gear...that's a little past it's prime. 

I wanted to craft something for winter and I wanted to make use of this snazzy Girl Gear sweater. Because I can't let my sister win.

So I came up with this winter weather fishtail headband. All you really need is a sweater you can't seem to part with but are willing to repurpose. It's perfect. You're welcome.


You'll need: A sweater, scissors, a needle, and thread. 


1. Cut off one sleeve. My sleeves just happened to be long enough to work. I'd say they were about two feet long.


2. Cut down the seam of the sleeve so you have one flat piece of fabric. Starting from the bottom, cut eight strips about one inch wide. Leave a little over an inch at the top (so don't cut all the way up the fabric). Before you start braiding, tug each strip to make the edges curl under and look cleaner.


3. Start fishtailing! Split the strips into two groups (four and four). Start from the outermost strip on the left and bring it to the middle, adding it to the group on the right. Then take the outermost strip from the right and bring it to the middle, adding it to the left group. Continue doing this, keeping the braid fairly flat. 


4. When you reach the end, clip all of the ends of the strips on top of each other to keep them in place.


5. Bring both ends of the braid together and stack the clipped ends on top of the other end.


6. With your needle and thread, tack the ends together to keep them in place.


7. Cut another strip from your sweater, about 2 1/2 inches wide and 6 inches long. 


8. Stretch this strip to make the ends curl under. Wrap it around the ends of the headband and gather the edges on top of each other. Tack the strip to the headband. 


Lookin' good, kiddo.


Saturday, October 27, 2012

this is halloween.

This Halloween, promise me you won't dress up in one of those spandex body suits.
Please wear a coat when you go outside.
 
Remember to watch the Halloween episodes of your most beloved childhood TV shows.
If someone offers you a plastic spider ring, wear it.
 If someone offers you candy, eat it.
And always listen to Beyoncé.

Peace and Halloween Blessings,
Danie

I swear to goodness I'll craft soon.

Tuesday, October 23, 2012

sometimes.


Sometimes I don't have time to craft and take pictures of it.

Because sometimes I get to entertain people with theatre.

And sometimes I have time to put some pumpkin spice cappuccino in my gas station coffee after the Stairmaster kicks my tush.

Sometimes I'd rather eat Sunday morning breakfast with some of my dearest dears instead of look at a computer screen.

Sometimes I knit and watch Seinfeld instead of sleep.

Because sometimes knitting makes me feel more accomplished than most other things.

When I wake up in the morning, I sometimes just listen to jazz.

Sometimes you just need to quit your job at Starbucks because something better came along. And on the day that is your last, you should definitely draw hearts all over everyone's cup and maybe not charge them for their scone.

Sometimes your grandmother sends you a picture of herself dressed up as a bumblebee for a Halloween party. That day is the best day.

Sometimes I want a dog to pet. All of the time.

Sometimes there's a mega possibility you left your camera at that lovely Sunday morning breakfast. Real talk.

Peace out, girl scout. The craft projects in my brain want to be real, but the Hispanic Cultures midterm on Thursday says, "No way, José".


Sunday, October 14, 2012

apple cider muffins.

"Danie. How do you have time to bake?!"
  1. I like mornings a lot
  2. I do a lot of my homework...on the weekends. (HI, MOM AND DAD.)
  3. I like baking enough to make time for it
  4. I live too close to the food co-op
  5. Because I just do. I just have time.

Theatre majors like snacks. And when you're at rehearsal for 3+ hours a night, you most likely, at some point, want a snack.


Vegan Apple Cider Muffins

Makes 16 muffins.

Ingredients:

2 cups all purpose flour
1 1/2 tsp baking powder
1/2 tsp baking soda
1/4 tsp salt
1 Tbs cinnamon
1/2 tsp nutmeg
1 flax egg or other egg substitute
1/3 cup plain soy yogurt (or not soy)
1/3 cup maple syrup
1/3 cup brown sugar
1/2 cup apple butter (can sub applesauce, or pumpkin..or pumpkin butter)
1/3 cup apple cider
1 tsp vanilla
1/4 cup canola oil
turbinado sugar for muffin tops (optional)

Optional mix-ins: 1/2 cup chopped walnuts, 1 chopped apple

Preheat oven to 400 degrees and prepare two muffin tins. 

Whisk together flour, baking powder, baking soda, salt, and spices. Fold in walnuts, if desired.  In another bowl, whisk together flax egg, yogurt, maple syrup, sugar, apple cider, apple butter, vanilla, and oil. Stir in chopped apple. Pour wet ingredients into dry and stir until just combined. Fill muffin cups with batter and sprinkle turbinado sugar on top. Cook for 15-20 or until a toothpick, inserted, comes out clean.

Let cool for two minutes before moving to a wire rack. 

Tuesday, October 9, 2012

diy tribal print earrings.

Something exciting has happened.

For the first time I completely, totally filled each and every page of a journal. I started this journal during the summer after my senior year of high school. Sydney (one of the loveliest friends) and I sat down at my dining room table at my homehome and covered our composition notebooks with whatever we could find.

We also vowed to start a list of things we love. Mine fills up the last five pages of my journal. The last five pages of my journal are filled with 403 things I love. I could go on, but bottom line: you need to start one.

I'm so incredibly proud to have filled up those pages with so many thoughts. On people and things and pets and love and confusion (so much confusion) and happiness and home and here and this one entry where I talk about why I love coffee.

And now I get to start a new one. 

On to crafternooning! Tribal prints are way in for the fall...did you know?! These DIY earrings are made from mostly dollar store finds. You got this.

DIY Tribal Print Earrings


You'll need: Clear decorative marbles (you know what I mean...dollar store find for sure), nail polish, superglue, and earring posts.

1. Choose one color of nail polish that will be the outline of the design. On the flat side of the marble, paint any sort of design. Simple is best. Let dry.


2. Paint over the lines of the design with other colors of nail polish. You'll probably use more than one coat. Don't worry about it being perfect, imperfections won't show (and are beautiful!) Let that dry completely.


3. Attach earring posts to the flat part of the marble with superglue. Let dry.


Get yourself some earring backs and stick those bad boys in! You should probably make a million designs and then mix and match. Probably meaning definitely.


Thursday, October 4, 2012

the proudest of thursdays.

If there was a song playing at the conclusion of my nut butter making experience, it would be the reprise of "Climb Evr'y Mountain" from The Sound of Music. It would feature me (in traditional Austrian garb), ascending up a grassy hill, jar of almond butter in hand.


If you ever want to feel proud of yourself, take the time to make your own nut butter. It's not hard, it just takes time. 


You can totally handle it, though. And oh, goodness! I'm sorry! Do YOU carry cinnamon honey flaxseed almond butter, Mr. Grocery Store? I didn't think so.


Look at it. The lone champion of the nut butter challenge. I love you, homemade almond butter. You make me feel ALIVE. 

And now I need a nap.

Inspiration (with the addition of everyone's favorite font, Curlz MT):


P.S. I used this recipe as a basis for mine.

Monday, October 1, 2012

baked pumpkin chai donuts.

My parents came to visit this weekend. 

LOOK AT THEIR LOVELY MUGS.


This means a few things:
  1. I will be reminded of how I absolutely cannot maintain a clean room.
  2. A completely justified purchase of not only one...but TWO boxes of cereal. A highlight of the weekend.
  3. When I enter their SUV, I will be re-immersed into the land of my father's beloved 70s rock Sirius Radio station, think I will be able to name every artist of every song but then end of guessing REO Speedwagon instead of The Rolling Stones. Rookie mistake.
  4. There will be so. much. good. food.
That's the most important part--the food. We like it. Minneapolis has it. We find it. 

These baked donuts are inspired by the pumpkin-pecan donuts at my neighborhood's Birchwood Cafe. (Which is actually the MOST amazing). I don't have a fancy donut pan so I just used a less fancy muffin one. Sue me.

Vegan Baked Pumpkin Chai Donuts


Ingredients:

2 cups all purpose flour
1 Tbs baking powder
1/4 tsp salt
2 tsp cinnamon
1 tsp cardamom
1/2 tsp allspice
1/2 ginger
1/4 cup white sugar
1/4 cup brown sugar
3/4 cup almond milk with 1/2 tsp apple cider vinegar whisked in
2 Tbs melted non-dairy butter
3/4 cup pumpkin puree
1 tsp vanilla
Optional: cinnamon-sugar and more melted non-dairy butter for topping

Preheat oven to 350 degrees.

In a large bowl, whisk together flour, baking powder, spices, and salt. In a medium bowl, whisk together milk, melted butter, pumpkin, sugars, and vanilla. Pour wet ingredients into dry and stir to combine. Pipe "donut holes" onto a greased or lined cookie sheet or spoon batter into greased muffin tins, filling each well half-way. Bake for about 10-12 minutes. Let cool for 2 minutes before dipping into melted butter and rolling in cinnamon sugar. If desired. You desire it though. 

Store in an airtight container.


P.S. Props to the lovely being that can explain to me why I have to wait until the next day for my pumpkin treats to taste the most pumpkiny.